Thursday, July 31, 2014

Wild Visitor: Waiting for Gray Fox's Return

Thursday, July 31. 5:30 a.m.


The above image is not mine.

I sit on a small couch with my son Patrick squeezed beside me. He's watching My Little Pony on a laptop as I read. But, my periphery stands guard, looking out the front door.

I see a hydrangea flower, a lavender globe in the lower left of the door's frame; its backdrop is the grooved bark of a pitch pine, straight-backed and rising out of the frame.

Buddhist flags, a string of color (blue, white, red, yellow and green) cross the entire frame, ending before complete.

Beyond, a flower garden, a few orange lily buds yet to bloom, and a giant sunflower at the edge of the empty road, its face turned towards light to come.

I imagine the gray fox stepping into this frame as it did two days earlier.

I picture its shy but swift step materializing bit by bit from behind the pitch pine, crossing in front of the flower garden, under the flags, a moment so brief, as it comes-- and then I leap!

"What are you doing?'' Patrick calls, as I run to the door.

"The fox, I thought I saw the fox."

A tumble of gray limbs had streaked across the frame. I open the door and step outside.

The air is cold.

I walk around the corner of the yard, my nerves alert. I flinch when a branch cracks underfoot.

I look around the back, down the forsythia edge.

Was it a bird? I wonder. Was it my imagination?

I go back inside, returning to my place on the couch, next to Patrick, who returns to My Little Pony.

And I look to the pitch pine, under the Buddhist flags, and sense the moment is already gone.

Wednesday, July 30, 2014

Wild(ly good!) Meals: Stuffed Wild Grape Leaves & Iced Sumac Tea


With a summer thunderstorm yet to arrive, Patrick and I decided to head out, he secure in the back carriage as I pedaled the bicycle. My backpack held two plastic grocery bags, a small shovel, scissors, and a camera. I knew we'd have no problem finding the food we were after: wild grape leaves and staghorn sumac, both abundant on roadsides.
We rode around the corner, the back tire flicking up an arc of water from rain puddles (Patrick's carriage had a plastic windshield) and soon we stopped at a grapevine, twisted and clinging to black raspberry bushes, which Patrick and I had picked clean about two weeks earlier.


I plucked about 15 leaves as Patrick sat eating an apple in the carriage. I threw the shiny leaves in a plastic bag and pedaled on.
In no time, I saw the sumac, its distinctive red buds erect on the branches' ends. I pedaled over, reached up and grabbed a few branches, pulling each down in turn and snipping off their red flowers.


I dropped them in the backpack and then rode off again.
Having the plants we set out for, we just coasted around, feeling the warm humid breeze and watching all around.
Here's a pretty field we passed on the way.


And here are the recipes.

Stuffed Wild Grape Leaves
(Avoid common moonseed. It's poisonous, but you can easily avoid it.)


I start by boiling rice in salted water. I use a little extra water and boil a bit longer so the rice is sticky when cooked. Once finished, I mix the hot rice in a bowl with raisins and minced dill, basil and mint. I add salt and pepper until I like the taste. Sometimes, I sprinkle in a bit of cumin, too. Set aside.


I cut the stems off the grape leaves. You can save time by stacking a few on top of each other and cutting the stems off at the same time. 


Don’t stack too many, though, or you will cut too much off the bottom leaf.
Then, I blanch the leaves for about 10 minutes.
My Lebanese grandfather Ismael Ramadan (best name ever) taught me to pickle the leaves in vinegar before wrapping. You can skip this step, but the vinegar flavors the wraps with a nice tang.


I then place the leaves glossy side down on a table and scoop about a table spoon of the rice mixture onto the center of the leaf and then wrap using this process:


Fold the rear.


 Fold the sides.


Roll.


Once the grape leaves are wrapped, place them in a Dutch oven and cover them with water about half way up the leaves, and finish by covering them with a few leaves. 


Simmer the water and cover until the liquid evaporates, about 30 minutes.
Cool and then eat.

Iced Sumac Tea
(Note, avoid poison sumac; it's pretty rare and looks different--white flowers instead of red ones--than the edible kind but check this link to see what it looks like.)


I simply place the sumac buds into a pot of water, four cups or so. 


Then I place this in the sun and let it steep for about an hour. Every now and then, I squeeze the buds, bruising the flowers and pushing out the juices.


Once finished, pour the liquid through a strainer (I use a coffee filter placed in a halved milk carton) into a pitcher with some ice.


You can add sugar or not. The lemony taste will amaze you. It's wonderful.


Tuesday, July 29, 2014

Wild Visitors: Gray Fox


The teetering moment between night and dawn, fog wetting the air and circling the teepee of green polebeans which twists up like a wizard's cap on the soggy earth, a point among rumpled kale leaves, and then! And then! A gray fox, lighter than the fog itself, with a smoky tail trailing behind, steps through my field of vision and I rise and move swiftly to the door to see, but the fox has gone. I look in the tangled forsythia and behind the shed and at the edge of a small patch of woods, but nothing, only cool air in the blue morning.

Monday, July 28, 2014

Trials and Tribulations of Building a Bookshelf, Told Through Pictures

Lisa and I were in desperate need for a place to store books …


... and more books


… and toys.


So I began work on a bookcase with a toy bin, and started by cutting the shelves.


But I was soon stumped. I had wanted to make dado joints,


but I had to create a guide for the router. The guide keeps the router on track and from running amok. I searched YouTube for help, but most videos suggested using several vices and I only had one.


I tried a "traditional" method 


but the stones did not work


I cursed and then whispered: "I can't. I just can’t do it." This is the moment of crisis: When you realize that your ambition is greater than your knowledge and skills. As an aspiring writer, this happens to me all the time and it hurts.

I went inside and returned to YouTube to glean some knowledge and skills, but found nothing.

Then, I had an idea. (I love ideas.) I walked back outside, feeling inspired by a plan.

I grabbed a piece of plywood that was longer than the width of the two sides where I needed to cut the dado joints, and I screwed the plywood over the sides and into the table underneath, securing down the sides and creating a router guide.


And it worked. Riddle solved; knowledge and skills possessed (provided?). I cut the dado joints,


squirted wood glue in the grooves,


secured the shelves,


nailed one by four planks across the back


sanded and sealed with polyurethane


and the job was finished and books and toys had a new home.


Oftentimes, learning a new skill is a process of frustration and dread and this job was no exception. If you'd like to avoid the frustration and dread part, feel free to send me a message for more detailed instructions on how to build this bookcase. I would love to share with you.


Sunday, July 27, 2014

Reader Tip: Finding a Nail in the Grass


In response to the post Projects Gone Wrong: Deck Stairs, Sandy gave a helpful tip: "Have you tried trawling with a small magnet tied to a string? That's how we retrieved old nails out of our lawn. (We had been removing nails from scrap wood we wished to save for firewood; lots of nails fell onto the lawn during that project.)"

Saturday, July 19, 2014

Projects Gone Wrong: The Deck Stairs Saga II

Everything seemed to be going as planned as I nailed the stairs together.


I thought I was finished. I had figured out a way not to go to The Home Depot, as I had thought I was destined in my previous Projects Gone Wrong post.
To briefly recap, I had built deck stairs, but discovered upon completion that they were too steep and too shallow and because I did not have the needed wood in my woodpile, I thought I had to head to the hardware store.
But then a couple of days ago, my wife and I were making an emergency bathroom break for our three-year-old Patrick on our way to see my in-laws in Pittsfield when I noticed steps leading up to a door alongside a building.
"Box steps!" I called out to Lisa.
I often do this, calling out words connected to a conversation from hours if not days earlier.
"What?" Lisa said, looking at and around me as she walked Patrick up the stairs into the cafe with the bathroom.
"Box steps," I said, pointing at the example I had just seen. "I can build the deck stairs with box steps and I think I have the wood in the back; so I won't have to buy any."
"Oh," she said, shuffling our son Patrick inside.
I stayed there a second longer staring at the steps, imagining my upcoming project.

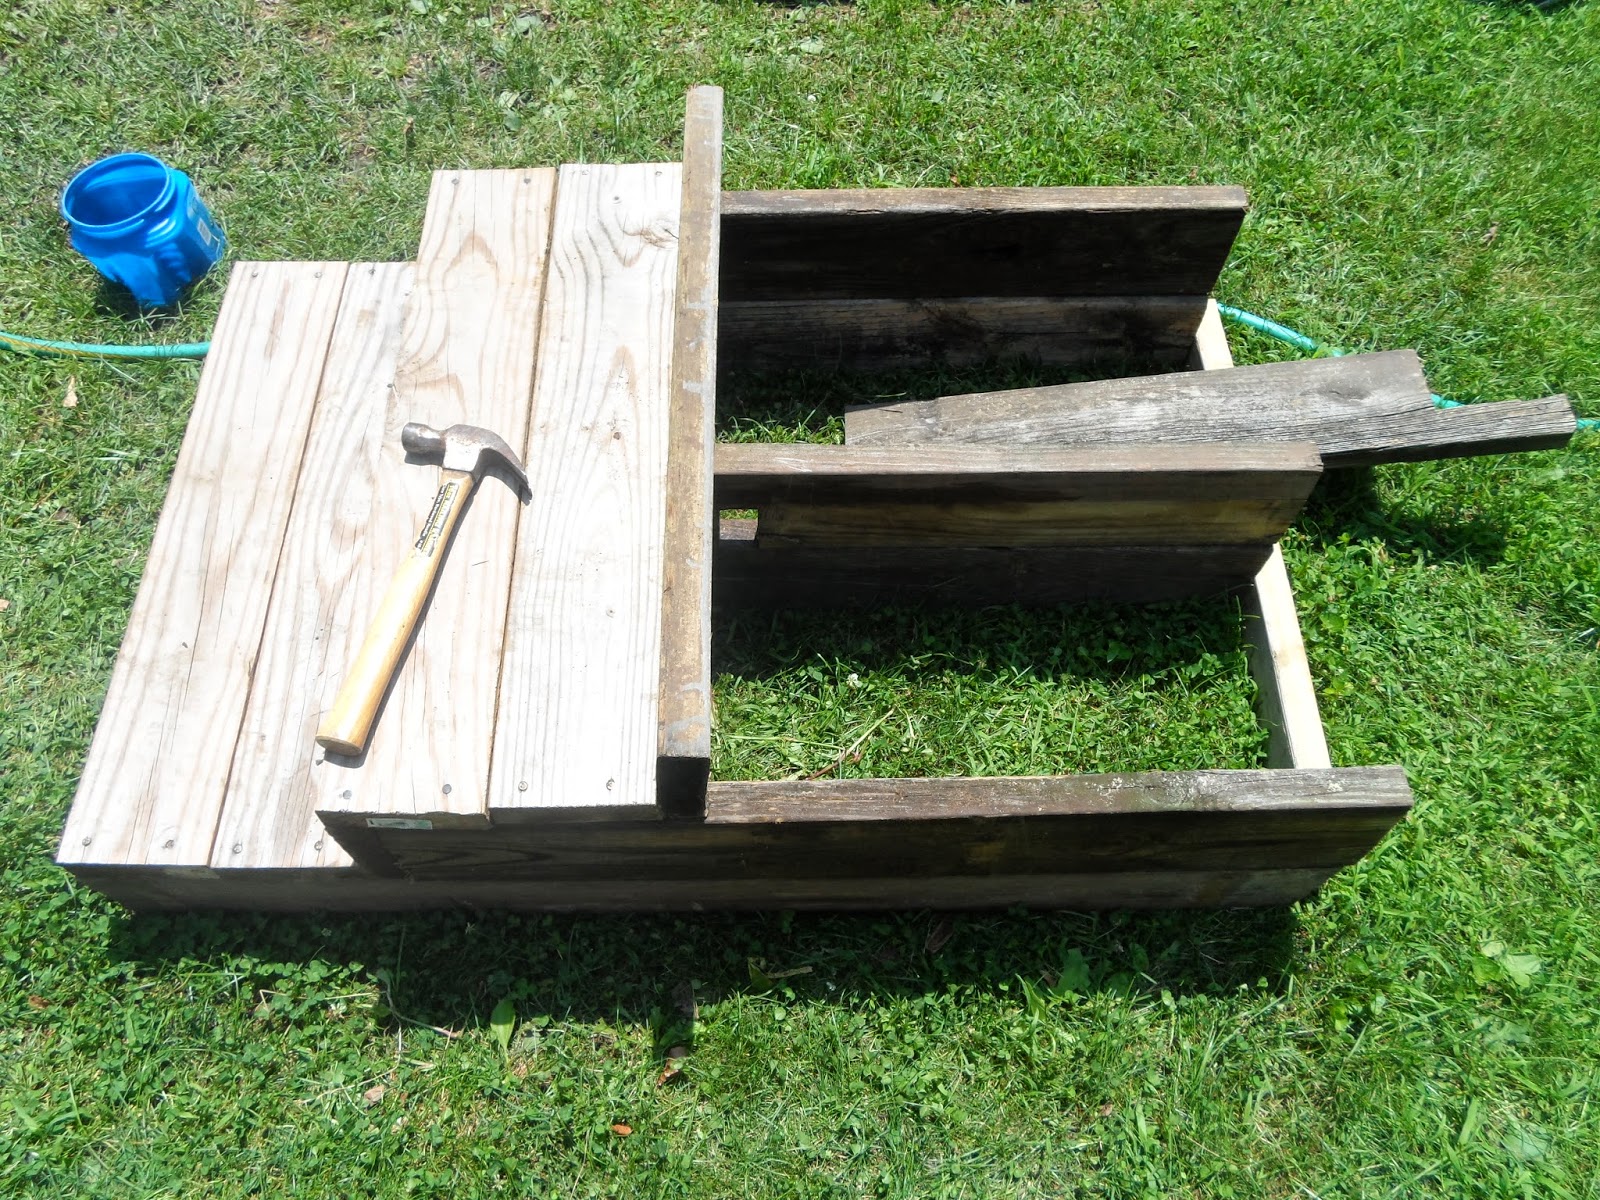
Box Steps, Almost Perfect

I'm not sure if "box steps" is the actual name for such steps, but basically this is what they are: They are made of several boxes, one built on the next, forming a series of steps. Although you cannot do this for high steps, if you have just a few, they make a clean, sturdy structure.
Basically, you build a box and then on the end, you lay two planks across the width on top; this becomes your lower step.
Then, you build a second box on the section without the planks, and then lay two planks on the end of that box; these become your second steps.


You keep this up until you have your desired number of steps.
I, however, failed to measure how long I should make the first box. To do this, I needed to measure the depth of each step and multiply that by three (because I had three steps); this would have given me the length of entire structure.
I often (nearly always) do this (screw up) when I build something for the first time and because I rarely build such things twice, my lessons collect dust until they are forgotten, which is about when I need to apply what I learned.
So, I had several two-by-sixes jutting out of the back of the stairs, which I needed to cut.
Sawzall!
Sawzall is the brand name for a reciprocating saw and if you do not have one, buy one. They come in really handy for awkward cuts.


So, with three cuts ...


... the stairs were cut down to size.
I nailed three two-by-fours to the  side and middle planks (see above photo) securing them in place.
Then, I nailed a two-by-four to the back and screwed the stairs to the deck.


Finishing (I believed at the time) I nailed down the top planks for the last step.


"You know what?" I said to Lisa as she sat on the deck feeding our infant Gabriel. "It's not centered."
In my haste I forgot to center the stairs in the opening on the deck. Lisa looked at me a moment.
"Eh," she said, with a shrug of the shoulders and a look of pity in her eyes. "It's not too noticeable."
"You're right," I said, ready to move on. "It's centered enough."
I stepped up the steps, testing out my creation, and then I looked down.
An empty sliver was looking back at me.


The stairs was missing a two-by-two strip of wood at the top, which I did not have in the woodpile.
"I have to go to Home Depot," I told Lisa. "I'll take the stairs out tomorrow and fill the gap in then."
"And before you put it back," said Lisa, "you can center it."
We'll see. ...

Recipe of the Week: Barbecued Kale Pesto Pizza with Mozzarella and Kielbasa

I had heard of the toughness of kale. I had read the articles about that guy from Vermont (?) with the T-shirt exclaiming “Got Kale!” But, I had not experienced the sweetness of this bitter green until last November. After a few flurries had fallen, I walked into my garden, which was raked clean of weed and vegetable alike, all except one. I approached the sturdy-stemmed kale plants, six of them standing in a straight row, brushing snow from their rigid leaves and cutting off a few for dinner. The taste was better than ever. Not only had the kale plant survived the cold but it had improved!  I learned later that cold weather sweetens kale. So, this year I planted as many plants as I could and searched for as many recipes as I could. Here’s a really good one I tried this week:

Barbecued Kale Pesto Pizza Topped with Mozzarella and Kielbasa


The Pesto
1. In a food processor, mince a few cloves of garlic. Use as much or as little garlic as you like. You’ll get a taste for this after making a few batches of pesto.
2. Stuff the food processor with kale leaves. Make sure to cut the stems off the leaves. Chop the leaves. This will take some time and will require that you stop, shut off the food processor and push the leaves down into the blade.
3. While pulsating the processor, mix in some oil. You will not need much; just enough so the kale is wet and made somewhat pasty. If you have olive oil, use it. I do not and I find Canola to work real well, as it’s flavorless and does not take away from the taste of the pesto.
4. Add some salt and pepper for taste.

The Dough
1. After emptying out the pesto, drop about 3 cups of flour into the same food processor. Do not bother cleaning it out. Rather, allow the pesto stuck to the sides to mix through your dough.
2. Add a teaspoon and a half of yeast (I always have a small jar of Fleischmann's Active Dry Yeast in the fridge) to the dough and a dash of salt. You can add more or less depending on your taste, but remember that you already added salt to the pesto.
3. Mix the flour.
4. Once mixed, pour a cup or so of warm water into a measuring cup, and while pulsating the food processor, slowly pour in the water.
5. Keep pulsating until you have a wet dough ball. If it’s really wet, do not worry. It it’s too dry, add a little more water.
6. Grease a bowl with oil and cover your hands in oil.
7. Scoop out the dough ball with your hands and work it into a smooth ball and drop it into the greased ball. Wrap a plastic bag around the ball and let it rise for about two hours.
8. Once it has risen, drop it onto a floured surface, knead it a couple of times and then work it into a rectangle. I’ll sometimes work it to fit over a rectangular cutting board, so I can get a good shape.

The Pizza
1. Turn on your barbecue and get it really hot.
2. Grease the grill grate. This will keep your dough from sticking. To do this, I pour a little oil into a bowl and using tongs dip a paper towel into it; I then brush the paper towel over the grate. My grandfather would use newspapers instead of paper towels, but something about  newspaper ink and food freaked me out a bit (although I often have to eat my own words.)
3. Flip your dough onto the greased grill.
4. It will cook really quickly, so have a spatula ready and lift the dough up and have a peek, making sure it’s not burning.
5. Oil the top of the dough. This will keep this side from sticking when you flip the dough. You'll cook both sides before putting on the toppings.
6. When the bottom has browned, flip the dough.
7. Meanwhile, cut some mozzarella cheese and sautée some slices of kielbasa. You do not have to sauté the kielbasa if it’s pre-cooked, but I think it tastes better.
8. With a pastry brush, spread your pesto over the top of dough. You are doing this while the dough is cooking. Don’t lay the pesto on too thick as you will see by tasting it that the pesto will be super strong.
9. Once you have painted a coat of green pesto onto the dough, layer on the cheese and slices of kielbasa. Also, make sure to continue checking the dough to make sure it’s not burning. If it’s getting too brown, lower the heat, or remove it from the heat, keeping  it to the side of the burners that are still aflame.
10. Close the barbecue and let the cheese melt. This should take less than five minutes.
11. Open and it's done!